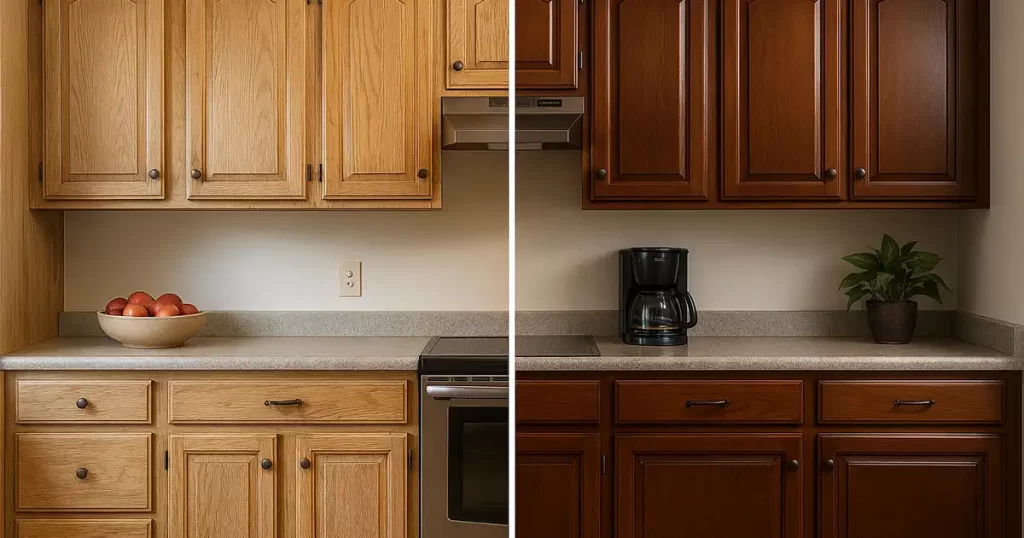
Your kitchen cabinets don’t have to stay worn or outdated. You can refresh them without the cost of new kitchen cabinets. Learning how to refinish kitchen cabinets with stain is a simple way to give them a new, lasting look.
This project brings out the natural beauty of the wood. It’s budget-friendly and can be done with basic tools. Follow the right steps and you’ll get a smooth, professional finish.
Tools & Materials
Before you start, gather everything you’ll need. Having the right tools and materials ready will make the process smoother and faster.
Tools
- Gloves
- Respirator
- Paintbrush
- Sandpaper (various grits)
- Sanding block
- Orbital sander
- Putty knife
- Scraper
- Rags
- Drop cloth
- Tack cloth
- Steel wool
Materials
- Stain
- Varnish or polyurethane
- Paint stripper
- Wood sealer
- Wood filler
- Denatured alcohol
- Painter’s tape
- Chlorine bleach (only if needed)
Preparation & Safety
Safety comes first. Wear gloves and a respirator. Keep windows and doors open so the air flows through the room.
Clear your work area before starting. Lay down a drop cloth to protect the floor. Move anything that could get in the way.
Have all your tools within reach. This keeps the process moving and avoids unnecessary stops.
Step-by-Step Refinishing Process
1. Label Cabinet Doors and Openings
Start by labeling each cabinet door and drawer. Use painter’s tape and a marker. This helps you put everything back in the right place later.
2. Remove Doors and Hardware
Take off the doors, drawers, and all hardware. Keep hinges, knobs, and screws in labeled bags or containers. This keeps parts from getting lost.
3. Clean and Degrease
Wipe down all surfaces with a degreaser or mineral spirits to remove grease, dirt, and residue. This step is essential for getting the stain to bond properly.
If you’re looking for product ideas, you can check out some of the best wood cabinet cleaners to find options that safely remove buildup without harming the surface.
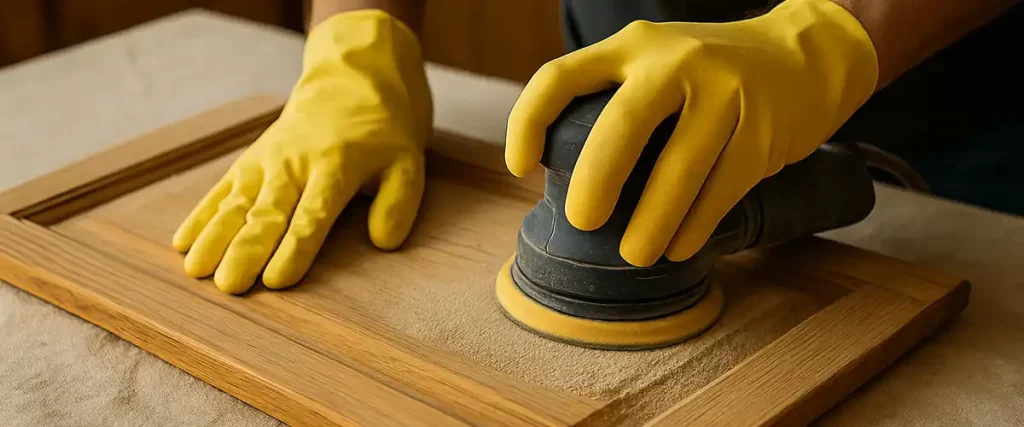
4. Strip or Sand Existing Finish
If you choose to strip the cabinets, apply a gel stripper with a paintbrush. Let it sit until the finish softens. Scrape it off with a putty knife, working in the direction of the wood grain.
If you prefer sanding, use an orbital sander or sanding block. Start with medium-grit sandpaper to remove the old finish, then switch to a finer grit for a smooth surface. Always sand with the grain to avoid scratches.
After stripping or sanding, wipe the surface with a tack cloth to remove dust and residue.
5. Fill Holes and Repairs
Check each cabinet door and drawer for dents, deep scratches, or holes. Fill these spots with wood filler. Use a putty knife to press it in and smooth it out.
Let the filler dry fully before moving on. Once dry, sand the area lightly until it’s level with the rest of the surface.
6. Final Sand and Dust Removal
Give all surfaces a final light sanding. This helps the stain go on evenly.
Vacuum up the dust. Wipe everything down with a tack cloth so no particles remain. A clean surface is key to a smooth finish.
7. Apply Pre-Stain Conditioner (Optional)
A pre-stain wood conditioner can help the stain soak in more evenly. This step is especially useful for certain softwoods.
Use a brush or clean cloth to apply a thin coat. Follow the product directions for drying time before you move on to staining.
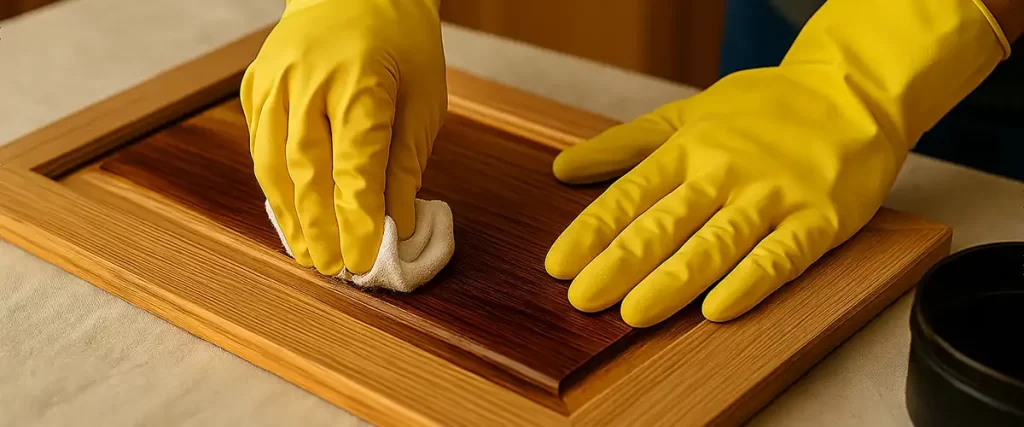
8. Apply Stain
Work in small sections so the stain doesn’t dry before you wipe it. Use a brush or clean cloth to apply it along the wood grain.
Once the section is covered, wipe off the excess with a clean rag. Always wipe in the same direction as the grain for a smooth look.
Check for missed spots before moving on. Even coverage now will give you a better final result.
9. Apply Protective Top Coat
Once the stain is dry, seal it with a protective top coat. This protects the wood and keeps the finish looking good longer.
Use a brush or foam applicator to apply a thin, even coat. Let it dry, then lightly sand with fine-grit sandpaper. Wipe away the dust and add another coat.
For best results, apply at least two coats. Allow the final coat to cure fully before regular use.
10. Reinstall Doors and Hardware
Once everything is dry and cured, put the doors and drawers back in place. Follow your labels so each piece goes where it belongs.
Reattach all hinges, knobs, and pulls. Make sure screws are snug but not overtightened.
Troubleshooting Common Staining Problems
Uneven or Dark Spots. This often happens when the old finish isn’t fully removed or the surface wasn’t sanded evenly. Lightly sand the affected areas and reapply the stain.
Lap Marks or Blotches. These appear when the stain dries in patches. Work in smaller sections and blend edges while the stain is still wet.
When to Re-Sand. If large areas look patchy or the color is off, sanding back to bare wood may be the only fix. Adding more stain over an uneven surface rarely evens it out.
Restaining Without Stripping
If your cabinets are in good shape but the color is uneven or faded, you may be able to refresh them without removing the old finish.
A gel stain can work over an existing finish to add depth and even out the tone. Clean the surface well, scuff it lightly with fine-grit sandpaper, and apply the gel stain according to the instructions.
If you want a bigger change in style or color, refacing cabinets is another option.
Common Staining Mistakes to Avoid
- Skipping surface prep or sanding too lightly.
- Applying too much stain in one area.
- Letting stain sit too long before wiping.
- Rushing between coats without letting them dry fully.
- Skipping the protective top coat.
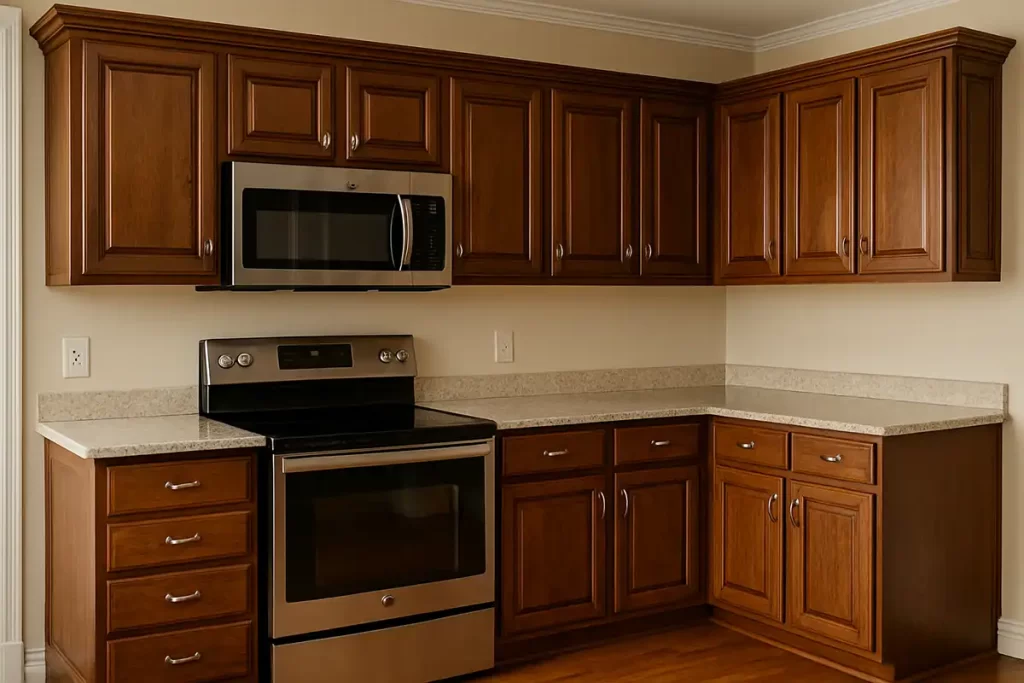
Give Your Kitchen Cabinets a Fresh, Lasting Finish
Refinishing kitchen cabinets with stain is a project that can completely change the look of your kitchen without the high cost of replacement. With the right preparation, tools, and a careful approach, you can create a rich, durable finish that brings out the best in your cabinets.
If you’re ready to take your kitchen beyond just refinished cabinets, Brucksch and Sons Remodeling offers complete kitchen remodeling services to transform the entire space.
From layout changes to new surfaces and fixtures, our team can help you create a kitchen that fits your style and needs. Contact us today to get started.